Unlocking Restaurant-Quality Crispy Onion Rings at Home: The Freezer Secret You Can't Miss
There’s something undeniably magical about biting into a perfectly golden, intensely crispy onion ring, giving way to a tender, sweet onion center. For many, this culinary delight is reserved for restaurant menus or drive-thrus. But what if we told you that achieving those elusive, restaurant-quality results is not only possible but surprisingly straightforward right in your own kitchen? The secret to mastering the ultimate onion rings recipe lies in a simple, often overlooked step: a brief sojourn in the freezer. Prepare to elevate your snack game and impress everyone with homemade onion rings that are truly better than any you've tasted.Why Homemade Onion Rings Reign Supreme Over Store-Bought
While the convenience of frozen onion rings is tempting, they simply can't compare to the fresh, vibrant flavors and superior texture of a homemade batch. When you craft your own, you control every ingredient, from the sweetness of the onion to the seasoning in the crispy coating. The harmonious blend of sweet, slightly pungent onion encased in a savory, crunchy shell is an experience that mass-produced versions just can't replicate. Imagine hot, fresh, and intensely crunchy rings straight from the fryer, their tender interiors offering a delightful contrast to the perfectly crisp exterior. This isn't just about food; it's about creating an experience, a delightful indulgence that transforms a simple side dish into the star of the show. Plus, knowing exactly what goes into your food brings an added layer of satisfaction and health consciousness.The Essential Ingredients for Your Perfect Onion Rings Recipe
Crafting exceptional onion rings begins with selecting the right components. While the list might seem simple, each ingredient plays a crucial role in achieving that perfect balance of flavor and texture.- The Star: Sweet Onions. For the ultimate onion ring experience, opt for sweet varieties like Vidalia, Walla Walla, or other mild yellow onions. Their naturally lower sulfur content means less of that sharp, tangy bite and more pure, mellow sweetness, which caramelizes beautifully during frying.
- The Wet Batter Foundation: Milk, Vinegar, and Egg.
- Milk: Forms the liquid base for our batter. For those with dietary restrictions, dairy-free alternatives work just as well.
- Vinegar (White or Apple Cider): When combined with milk, vinegar works its magic to create a makeshift "buttermilk." This slightly acidic mixture helps to tenderize the onion, mellow its flavor, and contribute to a more complex, richer batter.
- Egg: This is your binding agent, crucial for helping the dry flour mixture adhere firmly to the slippery onion slices. It acts like glue, ensuring a robust coating that stays put during the frying process.
- The Crispy Coating: All-Purpose Flour & Simple Spices.
- All-Purpose Flour: The backbone of your crispy exterior. For gluten-free options, a good quality gluten-free flour blend can be substituted without compromising texture.
- Salt, Garlic Powder, Pepper: These aren't just for flavor; they're essential for seasoning the coating itself. Don't underestimate the power of a well-seasoned batter to elevate the overall taste.
- The Frying Medium: Neutral Oil with a High Smoke Point. The choice of oil is paramount for achieving that golden crispness without imparting unwanted flavors. Look for neutral oils with a high smoke point, such as avocado oil (a healthier choice), safflower oil, peanut oil, canola oil, or even good old vegetable oil. Some enthusiasts even swear by lard or tallow for a truly old-fashioned flavor profile.
Mastering the Crispy Onion Rings Recipe: Step-by-Step Guide (Including the Secret Freezer Step!)
Now for the magic! Follow these steps closely, paying special attention to the often-missed freezer stage, to create onion rings that will rival any restaurant's.- Prepare Your Onions: Begin by carefully removing the top and bottom ends of your sweet onions, then peel away the papery skin. Slice the onions into even rings, about ¼ to ⅓ inch thick. Gently separate the rings into individual pieces. For a truly professional finish, try to keep the rings as uniform as possible for even cooking.
- Craft the Wet Mixture: In a medium-sized bowl, combine your milk and vinegar. Give it a quick stir and let it sit for about 5 minutes. This allows the vinegar to subtly curdle the milk, creating that beneficial buttermilk effect. After 5 minutes, whisk in the egg until thoroughly combined.
- Prepare the Dry Coating: In a separate shallow dish (a pie plate or wide bowl works well), whisk together your all-purpose flour, salt, garlic powder, and pepper. Ensure the spices are evenly distributed throughout the flour.
- The Double Dredge for Maximum Crispness: This is where the layers of flavor and crunch begin to build.
- First, take your separated onion rings and dip them into the dry flour mixture. Make sure they are lightly but completely coated. This initial flour layer provides a crucial foundation, giving the subsequent wet batter something firm to cling to.
- Next, dip the floured onion rings into the wet milk-egg mixture, allowing any excess liquid to drip off briefly.
- Finally, return the wet onion rings to the dry flour mixture for a second coating. Press gently to ensure the flour adheres well, creating a substantial crust. Place the fully coated rings onto a clean plate or tray, ensuring they don't overlap too much. Repeat this process until all your onion rings are beautifully double-coated.
- THE GAME-CHANGING FREEZER STEP: This is the "secret" our title alludes to, and it's absolutely crucial for achieving perfectly crispy, restaurant-quality results. Once all your onion rings are coated, carefully transfer the plate or tray into your freezer. Let them chill for a solid 15 to 20 minutes.
Why does this work? The cold temperature firms up the delicate batter, allowing it to "set" onto the onion. This prevents the coating from sloughing off prematurely when it hits the hot oil. Instead, the batter adheres firmly, frying evenly to a golden crisp without any bald spots or soggy sections. This step is a non-negotiable for sturdy, crunchy onion rings.
- Heat Your Frying Oil: While your onion rings are chilling, add about 1 inch of your chosen frying oil to a deep skillet, Dutch oven, or cast-iron pot. Place it over medium heat and allow it to warm up to an ideal temperature of 350°F (175°C). An oil thermometer is highly recommended for accuracy; maintaining the correct temperature is key to perfect frying.
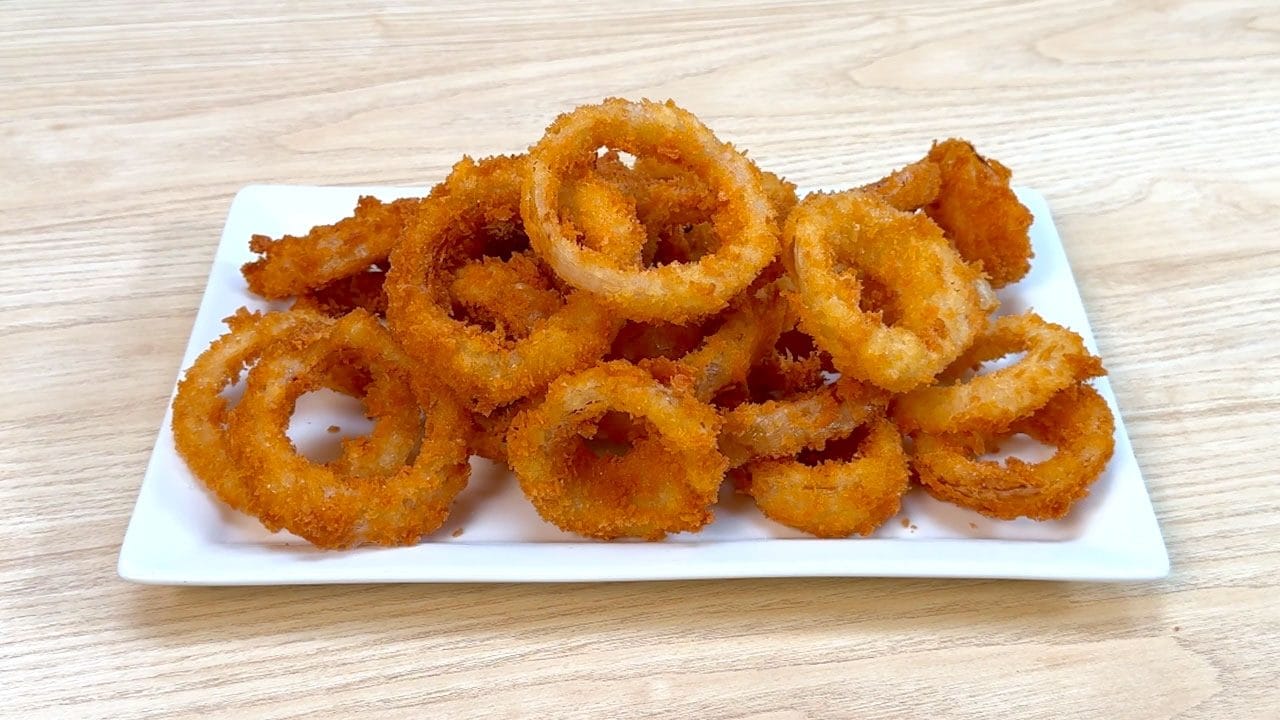
- Fry to Golden Perfection: Once your oil is at temperature, remove the onion rings from the freezer. Working in small batches (do not overcrowd the pan!), carefully place the frozen-set onion rings into the hot oil. Fry for 1-2 minutes per side, or until they reach a beautiful golden brown color and are wonderfully crisp. Overcrowding the pan will drop the oil temperature too quickly, resulting in greasy, less crispy rings.
- Drain and Serve: As each batch finishes, use a slotted spoon or spider to transfer the fried onion rings to a plate lined with paper towels. This helps absorb any excess oil. For maximum flavor, lightly sprinkle with a pinch of extra salt immediately after they come out of the fryer.
Tips for Achieving Ultimate Restaurant-Quality Onion Rings
Beyond the freezer step, a few additional pointers can help you truly master this Unlock Restaurant-Quality Crispy Onion Rings at Home.- Temperature Control is King: Always use an oil thermometer. If the oil is too cool, your onion rings will absorb too much oil and become greasy. If it's too hot, the batter will burn before the onion inside is properly cooked. Aim for a consistent 350°F (175°C).
- Don't Overcrowd the Pan: Frying in small batches is essential. Give your onion rings space to swim and crisp up evenly. This also helps maintain the oil temperature.
- Season Immediately: A sprinkle of fine sea salt right after they come out of the hot oil will adhere beautifully and enhance the flavor significantly.
- Experiment with Batters: While this recipe uses a classic flour-based batter, you can explore options like a light beer batter for an extra airy, crunchy texture.
- Pairing Perfection: Onion rings are versatile! Serve them as a side with burgers, hot dogs, or grilled chicken. They also make a fantastic game day snack. For more foolproof methods and easy approaches, check out our guide on Easy Homemade Onion Rings: Achieve Restaurant Crispiness.
